
Protect your application with a VirnetX Matrix Server and provide secure access to authorized users.
In order to protect your application from threats and enable zero trust access for authorized users, you will need to install the VirnetX Matrix Server software in front of the application. The VirnetX Matrix Server software will sit on your network between the network firewall and the application.
There are two different deployment options:
- Install the VirnetX Matrix Server directly on the application server or infrastructure
- Install the VirnetX Matrix Server on a separate virtual machine or server on the same local network or virtual private cloud (VPC) as the application
Start the process of securing a new application by clicking the New Application button from the Apps page on the Admin Console.
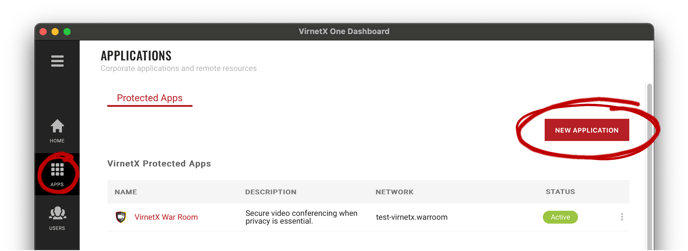
Here are the steps for protecting your application with VirnetX Matrix:
- Step 1 - Select a VirnetX Matrix Server
- Step 2 - Define what application or service you are securing
- Step 3 - Decide who has access
- Step 4 - Define how users will access this application
- Review the application setup and deploy
Let's get started.
Step 1 – Select a VirnetX Matrix Server
Each application is secured by one or more VirnetX Matrix Servers. A single VirnetX Matrix Server can be used to secure multiple applications (e.g., HTTPS, RDP).
You have two options:
- Select an existing VirnetX Matrix Server
- Create a New VirnetX Matrix Server
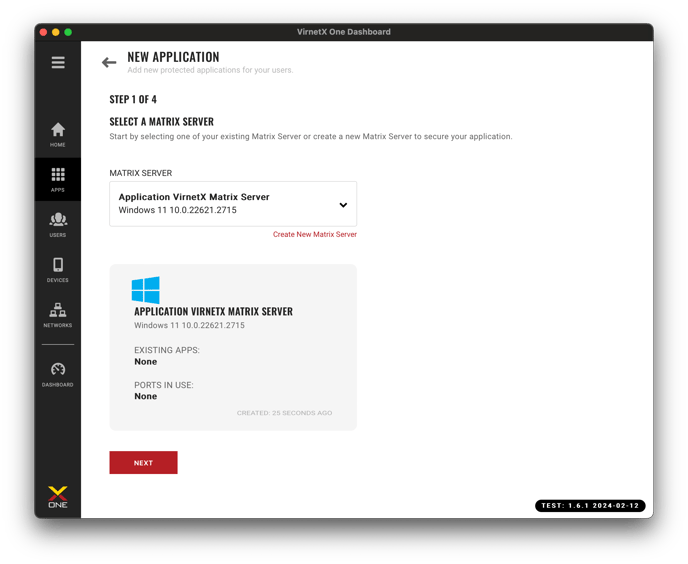
Select Existing VirnetX Matrix Server
From the drop-down, select the VirnetX Matrix Server used to secure your application. You will need to verify that the ports needed for your application are not currently in use on the VirnetX Matrix Server.
Click Next, to continue to Step 2.
Create A New VirnetX Matrix Server
If you're just getting started, you will need to first create a new VirnetX Matrix Server. You can create as many VirnetX Matrix Servers as you need to secure different applications.
First, click the Create New Matrix Server link below the Matrix Server drop-down. You will then be given instructions to install and setup a VirnetX Matrix Server. For additional instructions, you can refer to Create VirnetX Matrix Server.
Once you've completed the new VirnetX Matrix Server setup, it will automatically appear selected in the drop-down. Click Next, to continue to Step 2.
Step 2 – What Are You Securing
In this step, you will be entering the configuration details of the application, service, or resource you are securing with the VirnetX Matrix Server.
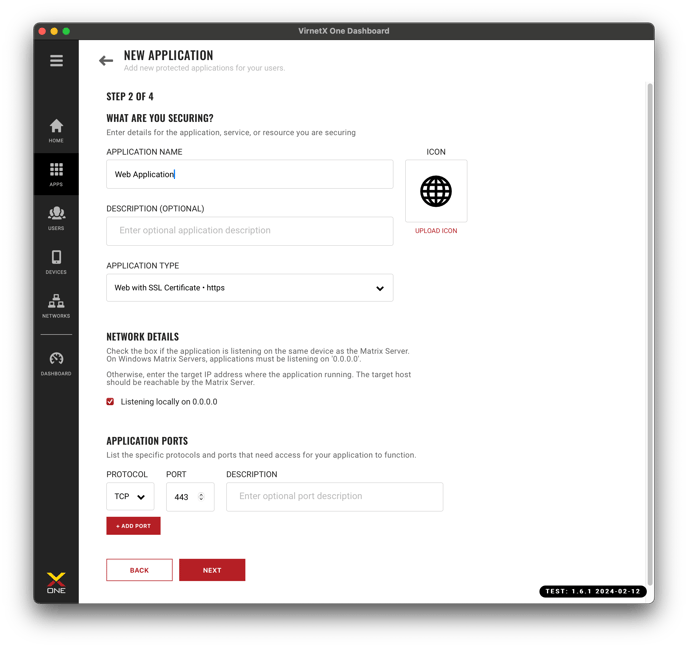
Start by entering a unique Application Name and optional Description.
Next, select the Application Type from the drop-down list of commonly secured applications. Once an application type is selected, the TCP/UPD application ports and a custom icon will be automatically updated.
Here are the available Application Types and default ports selected:
- HTTPS - Web Application with SSL (TCP 443)
- HTTP – Web Application (TCP 80)
- SSH – Secure Shell (TCP 22)
- RDP – Remote Desktop (TCP/UDP 3389)
- VNC – Virtual Network Computing (TCP 5900)
- Custom
Choose Custom if the predefined application types do not match the application or service you are securing.
Application Icon
Each protected application you secure has an icon that will be shown on the VirnetX One Dashboard for each user that has access. You have the option of choosing from a default list of generic icons, a predefined set of common application icons, a previously uploaded icon from your organization or uploading a new custom icon. View the list of available icons by clicking on the image in the ICON area. A list of icons will be available for you to select.
Upload your own icon by clicking Upload Icon, then browse and select the icon you want to use. You can zoom or crop the image, if necessary, by using scroll or pinch to zoom. Click Save to use the icon.

Network Details
In this step, you will be defining the IP address of the application in relation to the VirnetX Matrix Server.
By default, if the application is running on the same server as the VirnetX Matrix Server, then the local IP address is already selected.
- Listening locally on 127.0.0.1 (Linux)
- Listening locally on 0.0.0.0 (Windows)
If the application is not running locally, you will need to tell the VirnetX Matrix Server the IPv4 address of the application.
Select a custom IPv4 address by clicking the checkbox to deselect local listening. Now enter an address (e.g., 192.168.1.100) in the Target IP Address field.
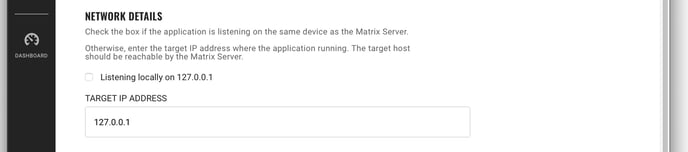
The IP address you enter must be accessible from the VirnetX Matrix Server on a local network or within a Virtual Private Cloud (VPC).
Application Ports
If you chose from the list of predefined Application Types, the common TCP/UDP application ports will be added. You can change the ports and protocols to match your setup.
If you chose the Custom application type, then you will need to define all the protocols and ports for your application. You can add up to 10 different application ports.
The application ports must be unique across the applications secured by a given Matrix Server. If you secure an HTTPS application using port 443, you cannot create a second application using that same port on that VirnetX Matrix Server.
The ports selected will also be the application ports accessible by users that have access. For example, if you secure an HTTPS application hosted on port 2375 then users will need to access that application through that port (e.g., https://application.company.com:2375).
Step 3 – Who Has Access
In this step, you will choose the users that will have network access to the application, service, or resource with the VirnetX One client installed on their device.
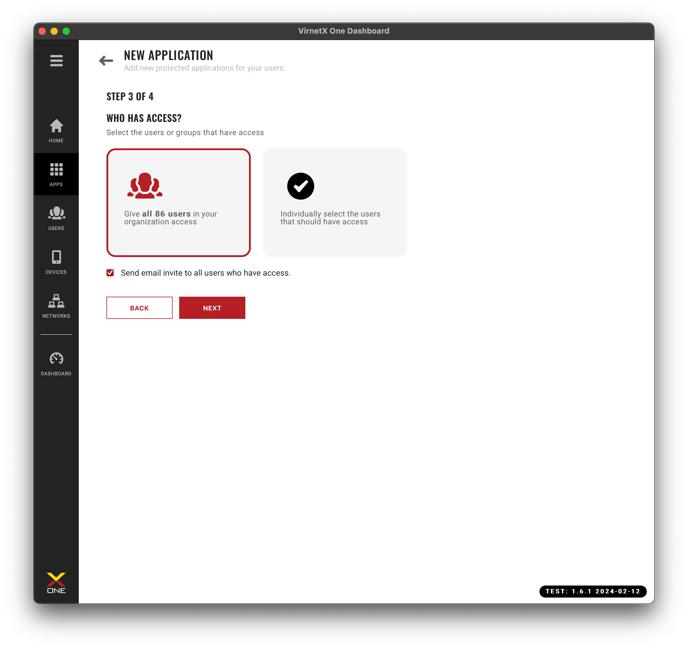
There are two options:
- Give all users in your organization access
- Individually select the users that have access
With the Individual option, you can select the list of users that have access.
Next, choose whether you want an email invite sent to all users who have access. Once application setup is complete, all users given access will receive an email to let them know they’ve been added. The application will automatically appear on the VirnetX One Dashboard, and they will get access regardless of whether you choose to send them an email.
Click Next, to select the individual users that have access or continue to Step 4.
Users selected for access and running an authorized VirnetX One client will be given network access to the application, service or resource secured by VirnetX Matrix. This means they will see the login page of a web application or authentication prompt of an RDP session as they did prior to being secured by VirnetX Matrix. The user will still need to be given authentication credentials for the application or RDP session to gain access. This is a separate step done outside of VirnetX Matrix and could be handled by an existing Identity Provider (e.g., Microsoft Active Directory).
Step 4 – How Will Users Access This Application
In this step, you will define the host name users will use to access the application and the secure domain name.
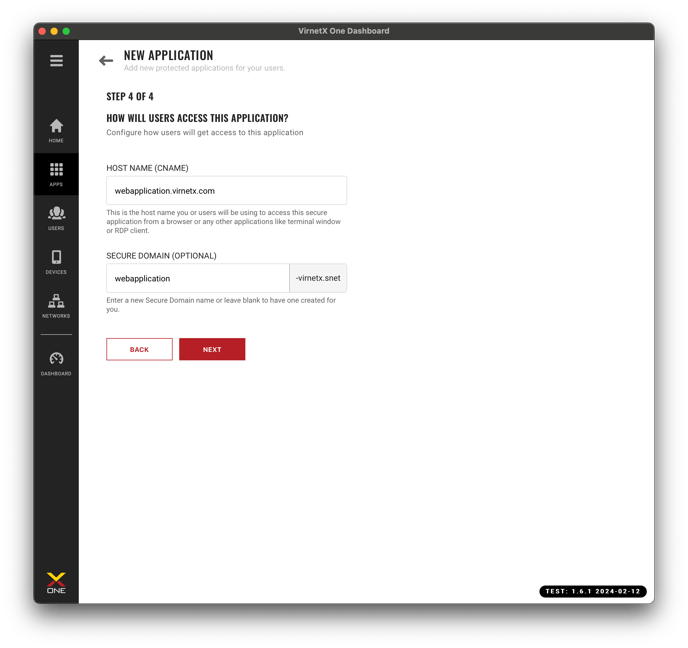
By default, a host name (e.g., application.company.com) is selected based on the application name and the organization name. The host name is how users will access your secure application from a browser or other applications like a terminal window or RDP client. You can define a custom host name that make sense for your organization based on domain names you own.
Each application is allocated a unique VirnetX Secure Domain. This is a virtual network where users are given access to connect to the application you are securing. By default, a unique secure domain name is selected, but you can change the domain name prior to the hyphen (e.g., custom-virnetx.snet).
Click Next, to review the VirnetX Matrix Server configuration and access information from the previous steps.
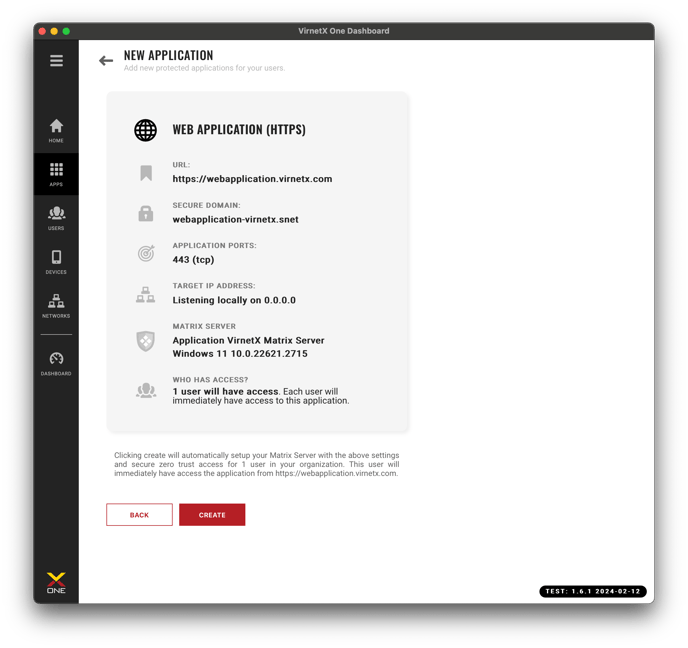
Review Setup
Take a minute to review the selected VirnetX Matrix Server, application setup information and users that will have access. If there are any changes, click Back, to make those changes on the previous setup pages.
Click Create to finalize the setup and grant access to the users.
This could take up to a minute for everything to be processed and users given application access.
Resolving Issues
The following section discusses issues you might face when securing an application with VirnetX Matrix. Each issue gives you steps to take to resolve the issue. You can also contact our support team if you need assistance getting things working.
The following
Configuration Problem

This problem may occur if the application you are trying to secure is not listening on the ports or protocols specified in the configuration. In this case, the VirnetX Matrix Server is unable to forward user traffic to the application properly.
Steps to resolve the issue
- Check that the correct application ports and protocols were selected for the VirnetX Matrix Server configuration. You can edit the VirnetX Matrix Server configuration to fix the problem
- Verify the application is listening on those ports at the defined IP address.